

Like most Canadians, I love maple syrup. We do it well. Canada produces about 70-75% of the world’s demand, and 90% comes from Quebec (d’erable). It’s true that Canada’s Indigenous People taught settlers how to tap the trees in spring. Our flag sports the maple leaf. Some folks think our anthem should be The Maple Leaf Forever.
I’m a bit of a maple syrup ‘snob’. If I’m having breakfast at a restaurant and order pancakes or waffles, I always ask…” do you serve real maple syrup?” No substitutes thank you. It’s always the ‘real deal’ at home.
Making a little maple syrup is fairly easy. Making lots is a bit different. First, you need plenty of time, sugar maples, firewood, pails/buckets, spiles (the taps or spigots you put in the tree), evaporator trays, and a heat source to evaporate the sweet liquid. Today’s big producers use a plastic pipeline to gather the sap. If you walk into a maple bush that is set up this way, it looks a bit like a spider’s web. But for the non-commercial syrup lover, there are a few options.

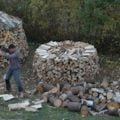
Sap starts to run through the spiles as freezing February weather loosens its grip and the spring thaw arrives. The length of the season certainly depends on the weather but cold nights and warm days over freezing are best. Buckets are hung from hooks on the spiles to collect the flow. From there it’s off to a heat source to reduce it. Many of us have tried boiling it down on the stovetop in the kitchen. It works but you’ll get moisture all over the kitchen walls. A few years ago I tried a simple stock pot on a grill over an open fire. I got a few litres from about five taps. But it was very labour (and firewood) intensive.
This season we’re ready to tap several trees and will be hanging ten buckets ( bigger trees can take 2 buckets).
I use simple white plastic buckets with a small hole at the top to hook onto the spile (round or rectangular buckets are fine). It is a good idea to cover the buckets if you can to avoid debris from settling in the bucket (some spiles have a little hole that allows you to connect a lid). You can always filter it later. Drill your holes for the spiles somewhere between waist and chest high on a bit of an angle upward so the sap flows easily down into the bucket. Be sure the spile fits snugly in the tree.


Once you get your sap, it’s time to boil it off and reduce it to syrup. I bought two simple stainless pans online They are approximately 12” x 20”x 6”. A third pan is for finishing the syrup and is 4” deep. From there the syrup can cool and be jarred, bottled or canned. It will last a long time and refrigeration will certainly extend the shelf life. The pans are approximately $40.00 each.

This brings us to our “main attraction”. The stove. What to do? Try building a stove made of cement blocks. You’ll need about 30 regular sized cement blocks. They’ll cost you about $3-5.00 each and probably best to have them delivered check your local building supplies outlet. Delivery will be an added cost.

It is a bit like Lego. You’ll make your own stove by assembling the blocks. No mortar is required. Here’s a great You Tube link to help you. It shows the design. The evaporator pans simply straddle the bricks on the top.

“The Simplest Maple Syrup Sap Evaporator” – YouTube
Before anything else, be sure you have a fire permit. Secondly, consider getting some welding gloves to handle the pans – they’ll be hot. You can ladle the sap/syrup but a ‘pour’ might be more efficient and effective.
Steps to Build Your Stove:
- Make your base. Take 12 blocks and arrange them in a 3 x 4 (12) configuration.
- Stack your side blocks forming two rows on top of the base.
- You can actually make a chimney at the back end.
- Leave the front end open to feed your firewood. I left an extra block out front.
- When sugaring off is finished you can disassemble the blocks and store them elsewhere. The blocks should last a quite a few seasons.
The pictures included will help guide you.

Now all you have to do is wait for the sap to flow. Be careful not to burn the syrup by reducing it too much. The ratio is generally 40:1 (sap to syrup). Be sure to have a big pancake breakfast to celebrate – maybe outdoors – and savour the flavour of Canada. The stove with a grill on top can be your cook stove with a few cast iron frying pans.


You might even get enough syrup to gift to friends and family.

Good luck! I hope you give it a try. Maple trees are like people – so much untapped potential.

Michael Schultz is a freelance writer living in Halton Hills who loves maple syrup. This article is dedicated to his friend, outdoor enthusiast, and inspiration Jim Henderson.